

Master Terraform: Beginner’s Pro Install Guide
So you want to learn Teraform, huh? Great choice. As one of the most popular infrastructure as code tools out there, Teraform is a must-have skill for any DevOps engineer or cloud architect. But getting started with Teraform can feel overwhelming with all the concepts and components you need to understand. Don’t worry, this guide will walk you through installing Teraform and give you a primer on the basics so you’ll be building infrastructure in no time. By the end, you’ll have a solid foundation to start using Teraform in your own projects and be well on your way to becoming a Teraform pro!
What Is Terraform and Why Should You Use It?
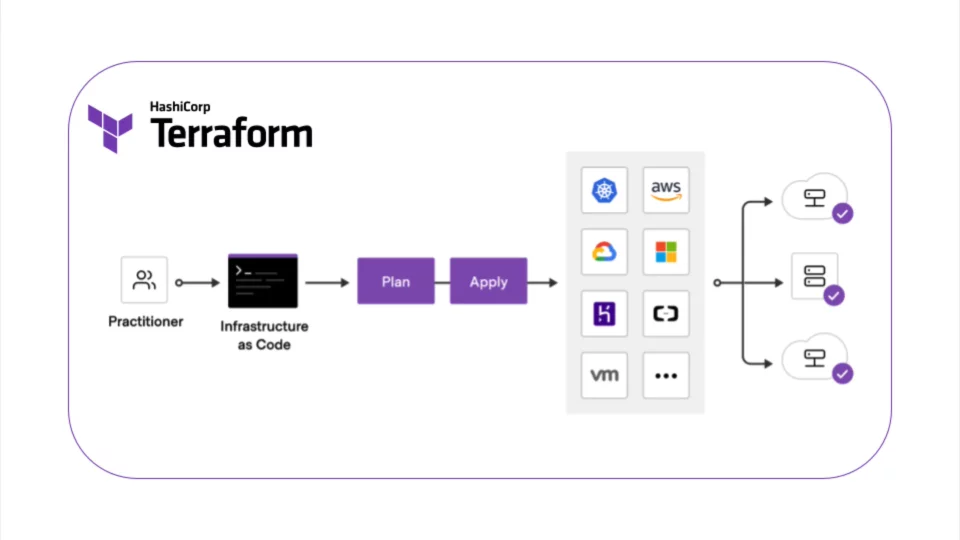
Teraform is an open-source tool for building, changing, and versioning infrastructure safely and efficiently.Using a simple syntax, you can spin up new virtual machines, provision storage, set up a virtual network, and more with just a few commands.
Why should you use Teraform? A few key reasons:
It’s cloud agnostic, so you can use it with AWS, GCP, Azure, and more.The syntax is the same no matter which provider you choose.
It’s idempotent, meaning you can run the same commands multiple times and you’ll get the same result.Teraform won’t create resources that already exist.
It’s version controlled, so you can track changes to your infrastructure over time.You’ll always know what’s deployed and be able to roll back if needed.
It’s easy to get started with but scales to massive, complex infrastructures.You can use Teraform for a simple project with a few resources or an enterprise setup with thousands of machines and resources.
It has a simple, easy to read syntax so you can pick it up quickly but is also powerful enough for any infrastructure needs.The Teraform syntax is like writing code to spin up your infrastructure.
It integrates with version control tools like Git so you can collaborate with team members on infrastructure changes.
Teraform is a must-have tool for any system administrator, DevOps engineer, or developer managing infrastructure. With Teraform, you’ll spend less time manually building resources and more time innovating. So, what are you waiting for? Start using Teraform today!It’s cloud agnostic, so you can use it with AWS, GCP, Azure, and more.The syntax is the same no matter which provider you choose.It’s idempotent, meaning you can run the same commands multiple times and you’ll get the same result.Teraform won’t create resources that already exist.It’s version controlled, so you can track changes to your infrastructure over time.You’ll always know what’s deployed and be able to roll back if needed.It’s easy to get started with but scales to massive, complex infrastructures.You can use Teraform for a simple project with a few resources or an enterprise setup with thousands of machines and resources.It has a simple, easy to read syntax so you can pick it up quickly but is also powerful enough for any infrastructure needs.The Teraform syntax is like writing code to spin up your infrastructure.It integrates with version control tools like Git so you can collaborate with team members on infrastructure changes.
Step 1 – Installing Teraform on Your Local Machine
To use Teraform, you first need to install it on your local machine. Here are the steps to get up and running:
Download the Teraform Binary
Head to the Teraform downloads page and grab the binary for your OS (Windows, macOS, Linux). Once the download completes, unzip the file. This will give you an executable called terraform.
Add Teraform to Your PATH
On Windows, you can add Teraform to your PATH by running the following in PowerShell:
########powershell$terraform_path = "$env:USERPROFILE.terraform.d\bin"On macOS/Linux, add the Teraform binary to your PATH by running:
export PATH=$PATH:~/.terraform.d/binInstall the Teraform CLI Plugin
The Teraform CLI plugin provides autocomplete and other useful features. To install it, run:
terraform initThis will allow you to run the terraform command from anywhere.
This will download and install the plugin for your OS.
Create Your First Teraform Configuration
Now you’re ready to create your first Teraform configuration. Create a main.tf file and add the following:
provider "aws" {
  region = "us-east-1"
}

resource "aws_instance" "example" {
  ami           = "ami-123456"
  instance_type = "t2.micro"
}
Verify the Installation
Open your terminal and run terraform -v to verify Teraform installed properly. You should see the Teraform version number displayed.
Next Steps
You now have Teraform installed and ready to provision your infrastructure! Next, you’ll want to check out Teraform’s documentation to learn how to write your first configurations. The possibilities are endless with Teraform.
Step 2 – Configuring Teraform to Connect to Your Cloud Provider
To configure Teraform to connect to your cloud provider, you’ll need to take a few simple steps.
Authentication
The first thing you’ll need to do is authenticate Teraform to access your cloud provider’s API. This typically involves:
Creating an access key (AWS), service account key (GCP), or username/password (Azure)
Setting the appropriate environment variables:
export AWS_ACCESS_KEY_ID=YOUR_KEY
export AWS_SECRET_ACCESS_KEY=YOUR_SECRET_KEYFor GCP, you’ll need to set GOOGLE_APPLICATION_CREDENTIALS pointing to your service account key JSON file.
For Azure, set the AZURE_SUBSCRIPTION_ID, AZURE_TENANT_ID, AZURE_CLIENT_ID, and AZURE_CLIENT_SECRET environment variables.
Select a Provider
Next, you’ll need to configure the provider in your Terraform configuration. Edit the provider.tf file to include:
provider "aws" {

}
For GCP, it would be:
provider "google" {

}
And for Azure:
provider "azurerm" {

}
That’s it! With your credentials set and provider configured, Teraform will now be able to connect to your cloud provider’s API and allow you to build infrastructure.
Double check that the credentials are correct by running terraform init and terraform validate. If successful, you’ll see a message saying “Configuration is valid!” and you’re ready to start building infrastructure with Teraform like a pro!
Step 3 – Writing Your First Teraform Configuration File
Now that you have Teraform installed, it’s time to write your first configuration file to define your infrastructure. Teraform uses a simple syntax, HashiCorp Configuration Language (HCL), to define infrastructure in a declarative way.
Deploying an EC2 Instance
Let’s start by launching an EC2 instance on AWS. Create a file named example.tf and add the following:
resource "aws_instance" "example" {
ami = "ami-04b9e92b5572fa0d1"
instance_type = "t2.micro"
}
This will deploy an EC2 instance using the free tier eligible t2.micro instance type. The AMI is for an Ubuntu 18.04 LTS image.
To deploy this infrastructure, run:
terraform init
terraform apply
terraform init will initialize the working directory. terraform apply will show you a summary of the resources that will be created and prompt you to enter yes to proceed.
Once deployed, you’ll see output like this:
Apply complete! Resources: 1 added, 0 changed, 0 destroyed.
Outputs:
instance_id = i-abcd1234
The instance_id output shows the ID of the EC2 instance that was launched. You can log into your AWS console to view the running instance.
Congrats, you’ve deployed your first EC2 instance with Teraform! Teraform allows you to define not just single resources but entire application environments with resources like subnets, security groups, load balancers, and more.
To destroy this environment, run terraform destroy. Teraform will destroy all resources it created, leaving your AWS account as it was before.
Step 4 – Applying Your Configuration and Provisioning Infrastructure
Now that you have your Teraform configuration files defined, it’s time to apply them! This will actually provision the infrastructure you described.
1. Initialize your Workspace
The first thing you need to do is initialize your Teraform workspace. Run this command:
terraform initThis will install any Terraform providers required for your configuration.
2. Create an Execution Plan
Next, create an execution plan to see what Teraform will provision:
terraform planReview the execution plan to make sure it’s provisioning what you expect. If everything looks good, you’re ready to apply!
3. Apply the Changes
To actually provision the infrastructure, run:
terraform applyTeraform will show you the execution plan again and prompt you to enter “yes” to confirm and apply. Type “yes” and hit enter.
Teraform will now provision all the infrastructure described in your configuration files. This can take a few minutes to complete. Once done, you’ll see a message saying “Apply complete!” and a summary of what was added, changed, and destroyed.
Your infrastructure is now provisioned and ready to use! You can access resources like EC2 instances, load balancers, etc. through your AWS console.
To make changes to your infrastructure in the future, simply edit your Teraform configuration files and run terraform apply again. Teraform will intelligently determine what needs to be changed and make only the necessary updates to your infrastructure.
Using Teraform, you now have a convenient way to manage your AWS infrastructure as code! You can version control your configurations, automate deployments, and treat your infrastructure as a product. Congratulations on mastering the basics of Teraform!
Conclusion
You’re now ready to start building amazing infrastructure with Terraform. You’ve installed it, set it up, and even deployed your first configuration. This is just the beginning of your journey to becoming a Terraform pro. Keep practicing by deploying more complex infrastructure and learning all the built-in resources Terraform offers. Before you know it, you’ll be writing Terraform configurations in your sleep and building robust infrastructure on any cloud platform you choose. The possibilities are endless once you master Terraform. Now get out there and start building! You’ve got this.
Keep Going
You’re off to a great start learning Terraform! Here are some next steps to take your skills to the next level:
Practice, practice, practice. The more Terraform configurations you write and the more infrastructure you deploy, the more comfortable you’ll become. Start small and gradually increase complexity.
Learn about Terraform Modules. You can reuse modules to DRY up your configurations and reduce repetition.
Start version controlling your configurations with Git. This allows you to roll back changes and manage deployments.
Automate deployments with Terraform Cloud or Terraform Enterprise. This makes team collaboration and multi-environment deployments easier.
Learn about Terraform’s data sources. These allow you to pull information from external sources into your configurations.
Explore Terraform’s many providers beyond AWS. Try deploying infrastructure on Azure, GCP, OpenStack, and more.
You’ve taken the first step on a rewarding journey. Keep learning, exploring and practicing, and you’ll be amazed at what you can accomplish with Terraform. The sky is the limit – go forth and build amazing infrastructure!
I hope this helps get you started on the next stage of your Terraform learning. Let me know if you have any other questions.